机器学习算法之KNN

k-最近邻是基于实例的学习方法中最基本的算法。

基本描述

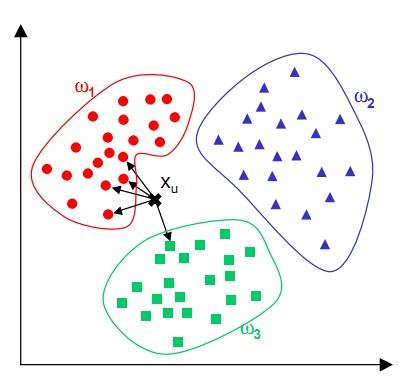
K最近邻(kNN,k-NearestNeighbor)分类算法,它的工作原理为:给定测试样本,基于某种距离度量找出训练集中与其最靠近的k个训练样本,然后基于这k个“邻居”的信息来进行预测。

在回归任务中可使用“平均法”,即将这k个样本的实值输出标记的平均值作为预测结果;还可基于距离远近进行加权平均或加权投票,距离越近的样本权重越大。既是最简单的机器学习算法之一,也是基于实例的学习方法中最基本的,又是最好的文本分类算法之一。

通过上面的描述,我们可以得知算法理论步骤:

1
2
3
1)算距离:给定测试对象,计算它与训练集中的每个对象的距离
2)找邻居:圈定距离最近的k个训练对象,作为测试对象的近邻
3)做分类:根据这k个近邻归属的主要类别,来对测试对象分类

算法优缺点

先来说说优点:

①简单,易于理解,易于实现,无需参数估计,无需训练;
②精度高,对异常值不敏感(个别噪音数据对结果的影响不是很大);
③适合对稀有事件进行分类;
④特别适合于多分类问题(multi-modal,对象具有多个类别标签),KNN要比SVM表现要好

再来说说缺点:

①KNN算法是懒散学习方法(lazy learning,基本上不学习),一些积极学习的算法要快很多。
②类别评分不是规格化的(不像概率评分)。
③输出的可解释性不强,例如决策树的可解释性较强。 ④还有一点也很容易想到,就是如果我们样本很不平衡的时候,有可能导致当输入一个新样本时,该样本的K个邻居中大容量类的样本占多数。该算法只计算“最近的”邻居样本,某一类的样本数量很大,那么或者这类样本并不接近目标样本,或者这类样本很靠近目标样本。不过这个时候我们可以通过采取权值的方法改进(比如最近权值高)。

20150805204307882

算法实现

算法应该很容易实现,下面来看看在kaggle中的手写数字识别中的实现:

首先我们完成将文件转化成向量的函数,方便读取:

1
2
3
4
5
6
7
8
9
10
11
12
# convert image to vector  
def img2vector(filename):
rows = 32
cols = 32
imgVector = zeros((1, rows * cols))
fileIn = open(filename)
for row in xrange(rows):
lineStr = fileIn.readline()
for col in xrange(cols):
imgVector[0, row * 32 + col] = int(lineStr[col])

return imgVector

然后我们加载整个数据库

1
2
3
4
5
6
7
8
9
10
11
12
13
14
15
16
17
18
19
20
21
22
23
24
25
26
27
28
29
30
31
32
33
34
35
36
37
# load dataSet  
def loadDataSet():
## step 1: Getting training set
print "---Getting training set..."
dataSetDir = './'
trainingFileList = os.listdir(dataSetDir + 'trainingDigits') # load the training set
numSamples = len(trainingFileList)

train_x = zeros((numSamples, 1024))
train_y = []
for i in xrange(numSamples):
filename = trainingFileList[i]

# get train_x
train_x[i, :] = img2vector(dataSetDir + 'trainingDigits/%s' % filename)

# get label from file name such as "1_18.txt"
label = int(filename.split('_')[0]) # return 1
train_y.append(label)

## step 2: Getting testing set
print "---Getting testing set..."
testingFileList = os.listdir(dataSetDir + 'testDigits') # load the testing set
numSamples = len(testingFileList)
test_x = zeros((numSamples, 1024))
test_y = []
for i in xrange(numSamples):
filename = testingFileList[i]

# get train_x
test_x[i, :] = img2vector(dataSetDir + 'testDigits/%s' % filename)

# get label from file name such as "1_18.txt"
label = int(filename.split('_')[0]) # return 1
test_y.append(label)

return train_x, train_y, test_x, test_y

然后就是我们的knn算法了:

1
2
3
4
5
6
7
8
9
10
11
12
13
14
15
16
17
18
19
20
21
22
23
24
25
26
27
28
29
30
31
32
33
# classify using kNN  
def kNNClassify(newInput, dataSet, labels, k):
numSamples = dataSet.shape[0] # shape[0] stands for the num of row

## step 1:计算距离
# tile(A, reps): Construct an array by repeating A reps times
# the following copy numSamples rows for dataSet
diff = tile(newInput, (numSamples, 1)) - dataSet # Subtract element-wise
squaredDiff = diff ** 2 # squared for the subtract
squaredDist = sum(squaredDiff, axis = 1) # sum is performed by row
distance = squaredDist ** 0.5

## step 2: 排序
# argsort() returns the indices that would sort an array in a ascending order
sortedDistIndices = argsort(distance)

classCount = {} # define a dictionary (can be append element)
for i in xrange(k):
## step 3: 选最符合的k个
voteLabel = labels[sortedDistIndices[i]]

## step 4: 统计标签
# when the key voteLabel is not in dictionary classCount, get()
# will return 0
classCount[voteLabel] = classCount.get(voteLabel, 0) + 1

## step 5: 返回频数最大的标签
maxCount = 0
for key, value in classCount.items():
if value > maxCount:
maxCount = value
maxIndex = key
return maxIndex

最后是测试函数:

1
2
3
4
5
6
7
8
9
10
11
12
13
14
15
16
17
18
19
20
21
22
23
# test hand writing class  
def testHandWritingClass():
## step 1: load data
print "step 1: load data..."
train_x, train_y, test_x, test_y = loadDataSet()

## step 2: training...
print "step 2: training..."
pass

## step 3: testing
print "step 3: testing..."
numTestSamples = test_x.shape[0]
matchCount = 0
for i in xrange(numTestSamples):
predict = kNNClassify(test_x[i], train_x, train_y, 3)
if predict == test_y[i]:
matchCount += 1
accuracy = float(matchCount) / numTestSamples

## step 4: show the result
print "step 4: show the result..."
print 'The classify accuracy is: %.2f%%' % (accuracy * 100)

由于这种题目的数据都是完整的,而且向量也是有规格的(32*32),也就是说每个测试例子都没有丢失的数据,而且每个参数的值也是在0-1的,所以这里不用进行数据处理阶段,至于要不要做特征工程我也不清楚。。。

-------------本文结束有空来玩-------------
坚持原创技术分享,您的支持将鼓励我继续创作!